Raspberry Pi Pan Tilt Tracking | OpenCV AI Kit Tutorial | App 4
Apr 12, 2021

Today we are going to build a Pan Tilt tracking camera using a Raspberry Pi and OpenCV AI Kit.
So how it works, is that the smart camera uses object detection to adjust these servo motors so that the center of the image lines up with the object center. All this works at Real-time 30 Frames per second on a raspberry Pi . So if you want to build your own then lets get straight into the tutorial.
Step 1: What You Will Need
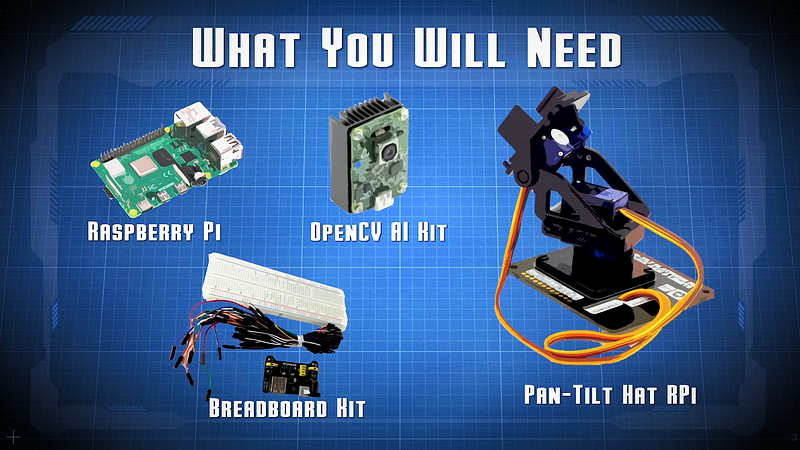
You will need the following
- A Raspberry Pi with all the accessories
- The OpenCV AI Kit, I’m using the OAK-1 because of its small form factor.
- A Pan tilt hat for Raspberry Pi — I’m using the Waveshare brand
- So this kit consists of a raspberry pi hat along with servo motors, screws and chassis.
- Electronics essentials such as a breadboard, and some jumper wires
Step 2: How It Works

To understand how it work, lets Look a bit deeper into the inner workings of the system.
Let us first draw a window which represents the input image. Then we draw a second window which represents our detected object, we assume that we will only detect one object for simplicity of this tutorial.
This object is predicted using a mobilenet ssd Object detection model that runs on the OpenCV AI Kit. So with the pre-trained model, you can detect people, bottles, dogs, chairs etc. There’s a total of 20 classes for you to test right away.
In our code, we calculate our object center in the x and y coordinates and find our exactly how far they are from the image center. If the object center cross a preset threshold window, it will trigger the servos to move either in the corresponding x or y direction. This process is repeated until the object center is within bounds of the image center.
Step 3: Assembly
I opted for the Pan tilt hat from Waveshare, the kit was really easy to set up within 10 minutes. The only thing you will struggle with, is finding the right screws for the various parts. The connections can’t get simpler than this as you first connect the servo motors to the PCB and slip on the HAT to the raspberry Pi GPIO header.
To attach the OAK-1 to the kit, I had make some modifications to the head of the Pan tilt unit. Nothing serious, just need to remove these stubs over here. And with some double sided tape we firmly attached the OAK device to the pan tilt hat.
Step 4: Download the Repo
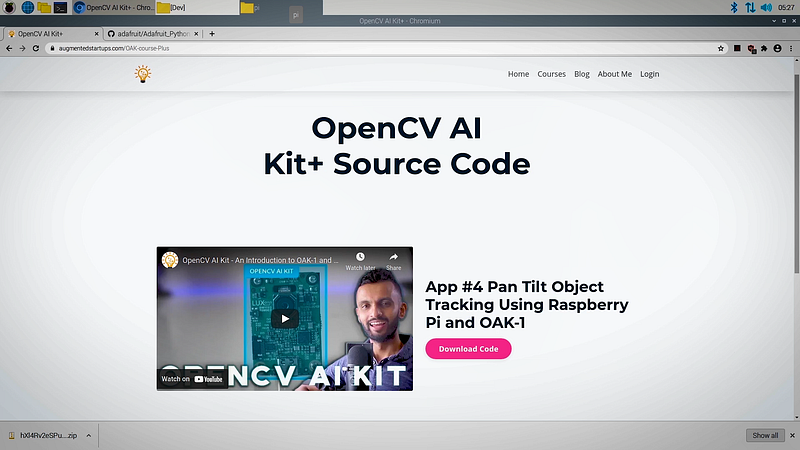
First you will need to download the code from our repo. Note that this tutorial is a premium tutorial and only YouTube and Patreon Members will have access to this code.
As a member you will also receive advanced tutorials, source code, technical support and early access to future projects. You will also get your name mentioned in our videos on Augmented Startups.
Now It is important to note that you have to first complete the App 1 tutorial on Medium or Youtube for this to work.
For now lets focus on the contents of app 4
Step 6: Code
If you are a member, either on YouTube or Patreon, there will be a members only post where you can find the link to the source code.
Download OAK from Augmented Startups
python3 -m pip install -r requirements.txt Install
python3 -m pip install -r requirements.txt Install Adafruit_PCA9685https://github.com/adafruit/Adafruit_Python_PCA9685/
python3 main.py
Now that its working. Lets move on to the testing and Demo.
Step 6: Summary
We just run the app, and we can test our code.
To Learn more Computer Vision, Raspberry Pi, OpenCV tutorials, please visit www.augmentedstartups.com/
From 80-Hour Weeks to 4-Hour Workflows
Get my Corporate Automation Starter Pack and discover how I automated my way from burnout to freedom. Includes the AI maturity audit + ready-to-deploy n8n workflows that save hours every day.
We hate SPAM. We will never sell your information, for any reason.